Impress your clients with modern, stunning, fully customizable website templates • Ad
Recently, I’ve started taking a Laravel course.
Today, I got to the “migrations” lesson, where you work with databases, and I needed to create a database.
The problem is that you can’t create a database from within Laravel by default. You can’t use an artisan command or something like that.
The instructor was using phpMyAdmin from XAMPP, and others recommended installing phpMyAdmin separately.
But I like to implement best practices whenever possible, so I have Laravel set up on the recommended Homestead environment.
Since I went to all that trouble, I didn’t want to use XAMPP nor install phpMyAdmin separately.
Luckily, after a bit of digging around, I found a quick and simple way to create a database in Laravel using Homestead, and I’ll share it you, ladies and gentlemen.
Creating a Database in Laravel Using Homestead
I assume that you’re already familiar with the Homestead environment, how to start Vagrant, access the virtual machine, and so on.
Step 1
Access the virtual machine by running vagrant ssh.
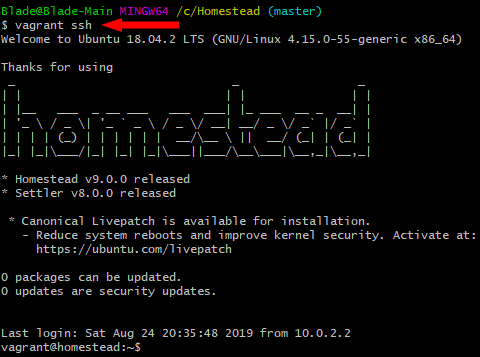
I’m using Git for this, by the way.
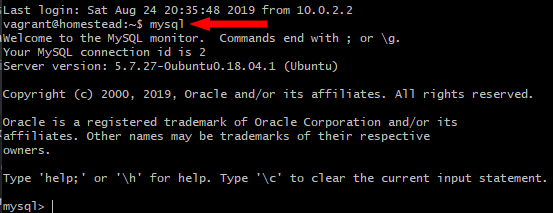
Step 2
Access MySQL by typing mysql and hitting Enter.
Step 3
Type
create database `database_name`;.
Of course, you can replace database_name with whatever name you want.

Make sure you use ` ` (backticks) , not ’ ’ (single quotes) because you’ll get a syntax error. You can also add the database name without wrapping it in backticks.
Step 4
Now, your database should be created. To verify, type show databases;.
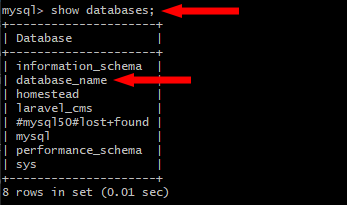
As you can see, the database was created.
Step 5
Go to Laravel’s .env file and add the new database name at DB_DATABASE.
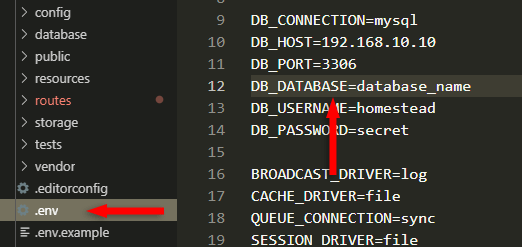
Make sure the DB_USERNAME and DB_PASSWORD are set to default: homestead and secret.
Also, if your DB_HOST IP is set to 127.0.0.1, you might need to change it to 192.168.10.10, otherwise, you might get this error when running artisan migrate:
SQLSTATE[HY000] [2002] No connection could be made because the target machine actively refused it.
Useful Commands for MySQL
Here are some MySQL commands that you’ll need to see your database’s data.
show databases;– shows all the databases;use _database_name_;– selects the database with that name;show tables;– shows the selected database’s tables;describe _table_name_;– shows the table columns;select * from _table_name;_– shows the data in the table.
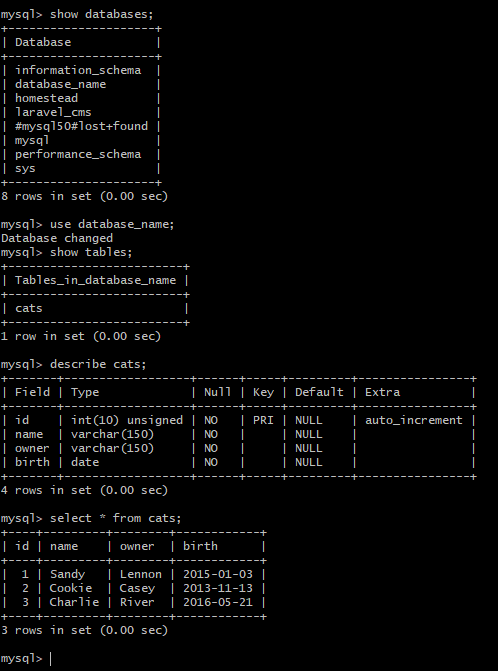
You can find out more basic commands here, but what I showed you is basically what you need to verify the database to see if what you’re doing in Laravel takes effect there.
You can add columns, tables, and so on, using Laravel.
That’s a Wrap
I hope this post has helped you out.
If you're interested in my web design services or free templates, want to collaborate, or just have something to say, feel free to shoot me a message.